As I explained in my guide to Recording Piano at Home, I start with a very simple set up. However, it is possible go go further once we gain experience.
Recording my playing and creating videos that I can post on social media gives me great pleasure. It’s not that I think my playing is anything amazing. Rather, it’s that now, at home, it’s possible to get really quite impressive results without needing to spend a fortune. Coming from the generation of the single cassette portable recorder it’s really quite something! These days, there is lots of ideal equipment for recording piano.
Often, we see minimum effort
I’ve watched countless YouTube piano videos where the overall quality is pretty poor (remaining polite). Whilst often the pianist is almost certainly more gifted than myself, the audio quality can leave a lot to be desired. Equally, often pretty much no effort has been made with respect to the visuals. A poorly focused, badly lit view of the pianist is all that we get.
To my mind, this type of things is a shame. Especially given that for pretty much all of us, all we need to create good results is in our pockets for most of the day. By that, I mean with little more than a phone you can record, edit, enhance and publish High Definition videos – so better than DVD quality!
Audio is of course most important
Naturally, the one area where the phone always lets us down is the built in microphone. These just aren’t designed to capture a piano – and why would they be? Therefore, this is often our first step in going to the next level.
I made the discovery of smartphone microphones some years ago. In fact, I now actually own two of them. I have a Shure MV88 (read my review) and a Shure MV88+. These are a fantastic, cost effective option. First, the quality is far superior to a phone’s built in microphone. Secondly, they are ultra portable and easy enough to use for even me! If you’d like to see how the two compare in a side by side shoot out, this video shows all.
The Shure MV88
As an Amazon Associate I earn from qualifying purchases.

A compact, high-quality stereo microphone designed for mobile recording, offering multiple polar patterns and excellent sound clarity for musicians and content creators.
View on Amazon
This means I may earn a small commission if you buy through these links, at no extra cost to you.
The Shure MV88+ Video Kit

A compact, high-quality stereo microphone designed for mobile recording, offering multiple polar patterns and excellent sound clarity for musicians and content creators.
View on Amazon
What about an upgrade?
That said though, I always wanting to see how I can improve things. As you might imagine my eyes often stray longingly toward more sophisticated equipment. Wouldn’t better equipment yield better results? Possibly, yet, I am also of the opinion that any complex equipment set up is not necessarily ideal for a one woman (or man) band. After all, we are neither professional audio engineers, nor can we keep an eye on lots of equipment whilst we’re trying to focus on our playing. This is why the ‘fire and forget’ convenience of smartphone microphones is hard to beat in some senses!
Therefore, if I am to upgrade, I need to think about how to do so without creating something that is going to give me too many points of failure. Instead, I want something that will actually make my life easier.
Perhaps the biggest problem when solo recording
One major issue for capturing a good recording is getting the correct levels – more specifically the ‘Gain’. If you’ll allow me, I’ll over-simplify this. When we record something into a digital file, then there is a minimum and maximum amount of sound that we are able to accommodate. This means we need to set the gain in such a way that the microphone ‘hears’ the quietest sounds clearly yet isn’t ‘deafened’ by the louder ones. Similar to the photographer who needs to set the exposure so that the darker parts of the image are still visible yet the lens isn’t ‘blinded’ by the lighter parts.
Quiet sounds
Let’s look at our first issue, the quieter sounds. To simplify things, the harder you make the microphone work to ‘hear’ the quieter sounds, the more likely it is to:
- pick up unwanted background noise (perhaps the fridge compressor coming on and off); and/or
- get that background ‘hissing’ (this is due to the ‘noise floor’ – a little like digital ‘noise’ on a photo taken with a high ISO)
Therefore, to get our optimum sound, we want to set the microphone gain as ‘High’ as possible with respect to the quieter sounds. However, this then gives us a challenge with the louder sounds.
Louder sounds
As the volume increases, then there reaches a point at which the microphone is ‘deafened’. This phenomenon is called ‘clipping’. Technically, it generally isn’t the microphone that has the problem but the software capturing the signal sent by the microphone. Basically, because everything is stored as numbers, there is an upper number and if something comes in that would require a number higher than this upper limit to capture it, then the software can’t cope. What you then hear in playback is ‘distortion’. Just like an under or over exposed photo, whilst there are things we can do with software to make the impact less obvious, we can’t get rid of it completely. In reality, our recording is ruined.
Therefore, we need to set the gain ‘low’ enough so that it can cope with the loudest of fortissimos as we play.
Balance is key
This is, in fact, a delicate balance and is why professional recording studios have engineers constantly monitoring what is going. They will use equipment and experience to ensure the optimal sound is captured. The trick is to try to capture sound as close to the top end of what is possible without ever going over (‘peaking’ as they say).
What is the solution when recording alone?
When we’re recording piano alone there is nobody keeping an eye on the equipment. Nobody is ensuring that the sound is getting recorded properly and at the correct level. Therefore, we have to set things as best we can and then hope all goes well. I recently, for example, recorded Liszt Consolation No. 3 and captured what I thought was a good performance (for me). Unfortunately, when I listened back the audio had ‘clipped’.
This happened quite simply because I moved the microphone to a slightly different position in the piano. This change was enough to mean that now the microphone got too much sound for the software to process.
Therefore, I think that for we pianists recording ourselves alone, we will get good bang for our buck if we can fix this problem.
Technology to the rescue
Luckily, technology again comes to our rescue. The technical term for this ‘get out of jail free card’ is 32 bit floating point audio. This is a (relatively new) format that is a little like ‘camera raw’ to photographers. Basically, each of these technological advances allow us to capture values that go well beyond what it is possible to display (for a photo) or hear (for an audio file).
Again, let’s simplify. For playback, the minimum and maximum rules still apply. For a file to play back correctly, you can’t try to output anything greater than the maximum value. Similarly, if the values are too low it will be barely audible. However, in 32 bit float, you can actually capture values that go way beyond this and adjust things afterwards in your computer. This allows you to adjust everything to an acceptable range after the event. It ultimately means you can adjust your recording perfectly to capture the quietest and loudest sounds at their best. It makes the recording process largely ‘fire and forget’ as there is no need to worry about levels when recording. We simply set everything up and know that no matter how loudly or quietly we play, we will capture everything we need to create a perfect result!
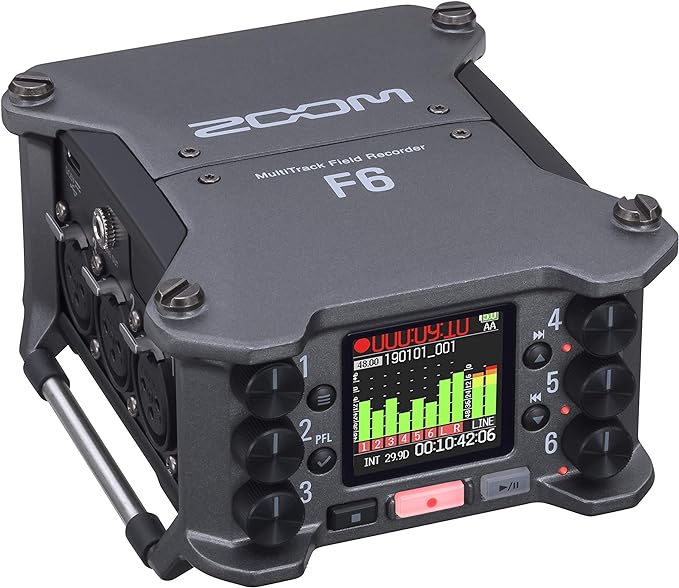
The Zoom F6
There are a few options for recording in 32 bit float and the best I have found (at least for my purposes) was the Zoom F6. This is basically what they call a ‘field recorder’. It is a device into which you can plug up to six microphones and it captures, and stores, the recordings on an SD card. The reason I say it is ideal for me is that:
- You don’t need to plug it into your computer to record
- It is fairly compact
- It is easily powered by batteries
For all of these reasons, it is simple to use in my home set up. Also, if I were to record on a piano elsewhere, it is still eminently portable and doesn’t require a laptop to use. As you will see if you check it out on Amazon, this little technological marvel comes at a price of course (especially when compared to the MV88 options above..
Zoom F6 Professional Field Recorder/Mixer for Filmmakers & Musicians with 6 XLR Inputs, Pro Quality Preamps, 32-Bit Float, Timecode, Battery Power, with Wireless Control
View on Amazon
Microphones
Unfortunately, I wasn’t be able to use my Shure MV88 or MV88+ with this. So, I needed one or more microphones to plug into it.
The challenge though is that quality microphones can run into the thousands of dollars. Moreover, when you look at high end studio engineers (using of course high end microphones), then the choice of microphones they will use to record a piano will often vary due to the:
- piano
- pianist
- repertoire
- vibe
- location
For example, I discovered that it is possible to make a (brighter) Yamaha sound more like a (mellower) Steinway by using a different microphone. Alternatively, what about the same pianist playing Bach’s Goldberg Variations and then a thundering Liszt Rhapsody on the same piano? Often here engineers will adapt the choice of microphone to suit the music.
Therefore, my conclusion was that it would pay to simply buy the best I can reasonably afford. Ideally, we need at least a ‘matched pair’ (so, a pair of microphones matched in the factory to be ‘identical’). There are various options from Rode and I chose the NT5 matched pair which start at at a reasonable enough price.

Matched pair of premium small-diaphragm condenser microphones with Stereo Bar for mounting two microphones in a stereo array.
View on Amazon
To make this upgrade, I was looking at spending anything from USD 800 to 1,000 minimum. This is a far cry from the USD 170 or so I invested in my original Shure MV88. The question is, was it worth the investment?
In short, I’d say that this is most definitely not a necessary thing to do. However, if, like me, you really get bitten by the recording bug, it’s certainly something that it is worth considering over time.
For a full breakdown of everything I use both now and in the past, you can check out my page on the equipment I use to create my YouTube videos.
Remember though, as I explain in my guide to recording piano at home, we can get excellent results with far simpler set ups. This might well work far better for you.